riverpod를 상태관리에 대해 자세히 알아보던 도중,
잘 정리되어 있는 글을 발견했다.
해당 글을 정리 및 번역한 글이며 원본 글은 아래에서 확인할 수 있다.
https://codewithandrea.com/articles/flutter-repository-pattern/
Flutter App Architecture: The Repository Pattern
An in-depth overview of the repository pattern in Flutter: what it is, when to use it, and various implementation strategies along with their tradeoffs.
codewithandrea.com
Riverpod 상태관리를 활용한 아키텍처에 대해 설명해보려 한다.
Riverpod 아키텍처는 4개의 레이어로 구성된다.
(Data, Domain, Application, Presentation)
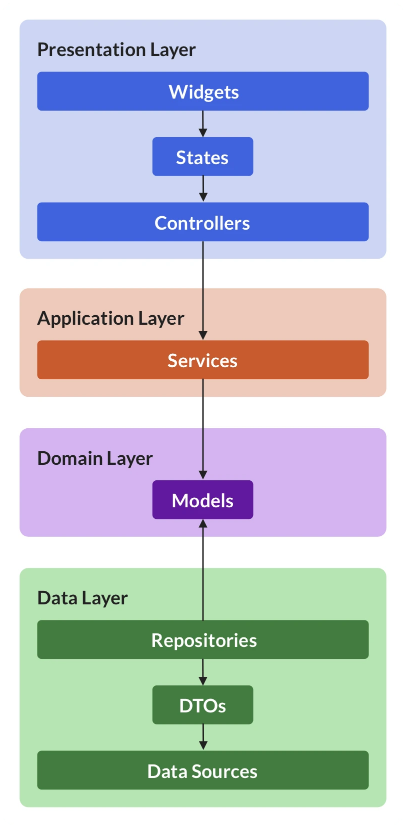
위의 각 화살표들은 레이어들 간의 종속성을 의미한다.
하나씩 자세히 알아보도록 하자.
1. 데이터 계층(Data Layer)
- Data Sources에 있는 세부 정보들로부터 도메인 모델(엔티티)를 분리하는 역할을 한다.
- 데이터 전송 객체를 도메인 계층에서 이해할 수 있는 데이터로 변환시켜 준다.
- 데이터 캐싱 역할 또한 한다.
- Repository Pattern
데이터 계층에서 repository pattern을 사용하여 Backend의 API와 같은 다양한 데이터 개체에 접근할 수 있으며,
앱의 도메인 계층에서 엔티티들이 안전한 유형으로 존재할 수 있도록 한다.
즉, 데이터 로직과 비즈니스 로직을 분리하여 도메인에서 일관된 인터페이스를 통해
데이터를 요청할 수 있도록 해주는 패턴이다.
★ 언제 이 패턴을 사용하나?
비정형 데이터(주로 Json 데이터)를 반환할 때 주로 사용..
- REST API를 사용할 때,
- local 혹은 remote DB 저장소를 사용할 때(Hive, Firestore, etc..)
- 기기별 특정 API 호출할 때(permissions, camera, location, etc..)
예를 들어서 이해해 보자.
아래의 api에서 날씨 정보를 flutter 앱에 받아오려고 한다.
https://openweathermap.org/api
Weather API - OpenWeatherMap
Please, sign up to use our fast and easy-to-work weather APIs. As a start to use OpenWeather products, we recommend our One Call API 3.0. For more functionality, please consider our products, which are included in professional collections.
openweathermap.org
이를 받아오는 repository 인터페이스를 만들면 다음과 같다.
abstract class WeatherRepository {
	Future<Weather> getWeather({required String city)};
}
http 또는 dio를 통해 api를 호출할 수 있다.
다음은 http를 통해 weatherrepository를 구체화한 httpWeatherRepository 클래스 이다.
import 'package:http/http.dart' as http;

class HttpWeatherRepository implements WeatherRepository {
  HttpWeatherRepository({required this.api, required this.client});

  final OpenWeatherMapAPI api;

  final http.Client client;

  Future<Weather> getWeather({required String city}) {
    	...
  }
}
이렇게 따로 파일을 두어 클래스를 생성하면, 앱의 다른 부분은 이에 대해 신경쓰지 않고 각자의 일을 수행할 수 있다.
- JSON data Parsing하기
api를 통해 불러온 데이터는 Weather Model 클래스에 정의되어야 한다.
예전에 자동으로 model 생성해주는 quicktype.io 를 소개했지만, 이번에는
freezed 패키지를 통해 만들어 보았다.
Freezed에 대한 소개는 다음 글을 참고하면 된다..
https://yerim-coding.tistory.com/26
[Flutter/플러터] Freezed 플러그인 사용하기 - (1)
Freezed란? 데이터 클래스에 필요한 편의 기능들을 Code Generation으로 제공하는 라이브러리 아래 공식문서를 살펴보자 freezed | Dart Package Code generation for immutable classes that has a simple syntax..
yerim-coding.tistory.com
@Freezed
class Weather with _$Weather{
   const factory({
   		required String city,
        ...
  factory Weather.fromJson(Map<String, dynamic> json) {
      ...
    }
}
생성한 model과 repository를 앱에서 초기화 하는 방법이다.
나는 riverpod를 사용할것 이기 때문에
import 'package:flutter_riverpod/flutter_riverpod.dart';

final weatherRepositoryProvider = Provider<WeatherRepository>((ref) {
  return HttpWeatherRepository(api: OpenWeatherMapAPI(), client: http.Client());
});
다음과 같이 초기화 해 주면 된다.
- 추상클래스(abstract class)와 구체 클래스(concrete class)를 언제 사용하면 될까?
각각의 장단점을 알아보자
▶ 추상 클래스를 사용할 때
장점 : 복잡하지 않다. 인터페이스를 한 곳에 볼 수 있어서 좋다.
함수명을 바꾸고 싶을 때, 초기화 코드에서 한줄만 바꾸면 된다.
단점 : 상용구 코드가 길어질 수 있다
▶ 구체적인 클래스 사용할 때
장점 : 상용구 코드가 적다
단점 : repository 명을 바꾸려면 많은 곳에서의 수정이 필요하다
repository 패턴을 사용하면 데이터 계층의 구현을 따로 관리할 수 있다.
따라서, 도메인과 프레젠테이션 계층은 각자의 역할에만 충실할 수 있으며
모델 클래스와 엔티티들이 안전하게 타입을 유지할 수 있다.
따라서 각 계층들을 분리하여 코드를 작성하는 것이 중요하다고 할 수 있다.
Repository 테스트 방법은 건너 뛰었다.. 알고싶으면 상단의 링크로 들어가보자
source code 또한 제공해 준다.
예제를 보면서 더 익혀 봐야 겠다..
'Flutter' 카테고리의 다른 글
| [Flutter/플러터] Riverpod 장점 및 사용법 (1) | 2022.09.28 |
|---|---|
| [Flutter/플러터] Riverpod를 통해 알아보는 플러터 아키텍처 - (2) Domain Model (0) | 2022.09.27 |
| [Flutter/플러터] Freezed 플러그인 사용하기 - (1) (0) | 2022.09.27 |
| [Flutter/플러터] getx를 사용하여 like 버튼(하트 버튼) 만들기 (0) | 2022.09.23 |
| [Flutter/플러터] Dart 반복문 쓰지 않고 리스트 합, 최댓값, 최솟값 구하기 - fold (1) | 2022.09.23 |

